Chapter 10 - Saving Files
Online Manual
Frequently Asked Questions
Data Recovery Basics
Chapter 1 - Introduction
Chapter 2 - Evaluation
Chapter 3 - Installation
Chapter 4 - Purchase
Chapter 5 - Activation
Chapter 6 - User Interface
Chapter 7 - Best Power Settings
Chapter 8 - File Recovery
Chapter 9 - Drive Recovery
Chapter 10 - Saving Files
Chapter 11 - Troubleshooting
Chapter 12 - Options
Chapter 13 - Raid Recovery
Chapter 14 - Disk Imaging
Chapter 15 - Customizing GUI
Chapter 16 - Legal
Appendix 1 - Technical Support
Appendix 2 - File Carving
Appendix 3 - References
Appendix 4 - Definitions
Appendix 5 - Icon Key
10.1 Validating a successful recovery
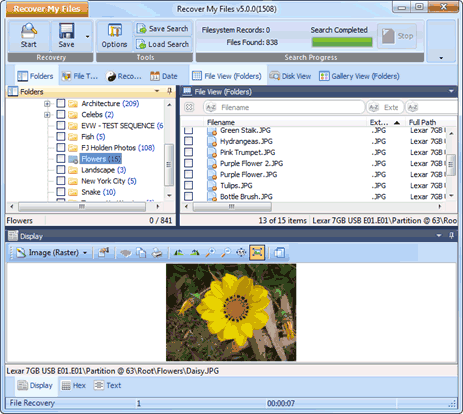
The principle way to validate a successful recover is to preview missing files in the search results window. Use the different data views with sort and filter functions (see 6.4) to locate relevant files. Click on documents and graphics to preview their content in the display view, as shown below:
10.1.1 Validate Extensions
A “Validate Extensions” test is a post search tool to test search results for valid or invalid content. It is a comparison between a recovered files extension (as given in the filename) and file signature (read from the data in the file header). It is based on the assertion that a file extension should match the file signature.
To run a validate extensions test;
At the completions of a search, select “Validate Extensions” from the Recover My Files drop down menu;
Or, select the Validate button on the program toolbar:
![]()
This opens the following screen:
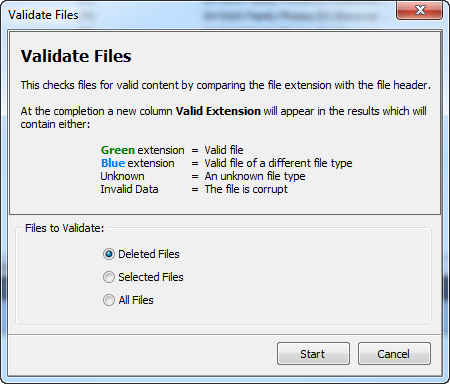
The tool creates and populates the “Valid Extension” column in file view, as shown below:
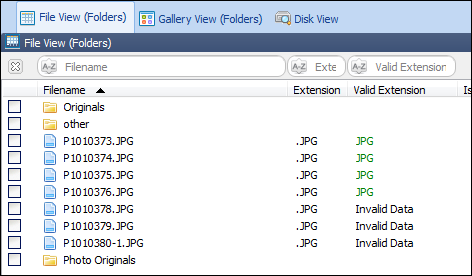
The following rules are applied:
- If file extension matches the signature, the file extension is written in green to indicate a valid file.
- If file extension and signature do not match, and the signature is known, the signature extension is written in blue to indicate a valid file of another type;
- If the file extension is in the list of known signatures, but does not match a signature, the entry is Invalid Data.
- If the extension is unknown, the entry is Unknown Type.
In the example above, a text filter on the valid extension column for “jpg” will return only jpg files.
![]() Not able to preview files: see 11.3.
Not able to preview files: see 11.3.
10.2 Save and load a listing of search results
When Recover My Files is closed, or a new search is started, any exiting search results are cleared from memory. In order to recreate the existing search results, it is necessary to run a new search. To avoid this, it is possible to save a listing of existing search results as an .rsv file so that they can be quickly reloaded at a later time.
|
|
To save a listing of search results, click the Save Session button and save a [search name].rsv file. |
|
|
To load list of search results at a later time, ensure that the problem hard drive is connected, select the Load Search button and load the relevant .rsv file. |
It is important to remember that you are as saving a listing of the search results only. If the content of the drive subsequently changes (i.e. new data is written to the drive), this may overwrite and destroy deleted files and the saved search results may no longer be valid. If you plan to reload the search at a later time, minimize the use of the drive in the interim.
10.3 Saving Recovered Files
10.3.1 What should I save?
Recover My Files is designed to get back your created photos, documents, music etc. Select and save the files that are most important to you. Remember;
- There is no point saving gigabytes of Windows System files that will be worthless to you and it will just slow the saving process down;
- Rather than trying to recover and save software programs, it is better to reinstall software programs from the original drives or installation files to be sure the integrity of their registry settings etc.;
- Start by saving only a small sample of files. Once you have saved them, go to the drive on which the files are saved and open them with their creating application (e.g. Word) to make sure they are complete. Once you are satisfied with the test, save a larger batch of files.
10.3.2 Where should I save the files?
The files must be saved to another drive. It is NOT possible to save the files directly to the drive from which they are being recovered (this would result in new data being written to the drive and overwriting and destroying yet to be saved files). You can save files to another drive letter on the same drive, a separate hard drive, a USB, thumb/pen drive, or a network drive.
The recommended option is that files be saved to an external USB drive. They are inexpensive, large capacity and can be easily connected to most computers.
Saving to a Network Drive
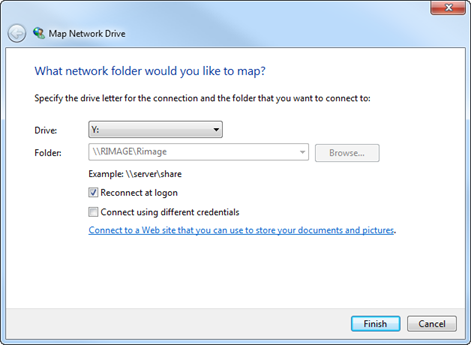
To save to a network drive a folder on the remote computer must be mapped as a drive letter on the computer running the recovery. To map a Network drive in Windows 7:
- Open Windows Explorer;
- Click on the Network icon and then click the desired computer (login to the remote PC if prompted);
- Right click on the desired folder on the remote computer and select “Map Network Drive...” from the drop down menu. The following window will appear:
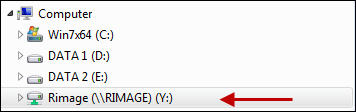
4. Click Finish. The drive letter should now be mapped to your computer. You should now see the drive appear as a drive letter in Windows Explorer, as shown below.
10.3.3 Best Power Settings
When preparing to save files it can be prudent to ensure that your computer power settings are adequately set to avoid any of the devices powering down during the save process. It is relevant if you are saving from a device which has lost its dive letter as Windows may not be able to adequately detect the device to keep it awake over an extended period. To set powers settings, follow the instructions in Chapter 7 – Best Power Settings.
10.3.4 How to select files to be saved
To select a file to be saved, in the search results screen place a tick in the box next to the file:
|
|
User selected file; |
|
|
A folder in which not all files inside that folder (or its sub-folders) have been selected. |
To select a Folder to be saved, place a tick in the box next to the folder, and all files within the sub folders will automatically be selected.
To select a group of files to be saved, hold down the SHIFT or CTRL key, highlight the files with your mouse, and then press the SPACE BAR to turn the selection ticks on (or off).
Gallery view currently only allows the selection of single files.
10.3.5 How much space do I need?
In the bottom border of the main program screen you can see how many folders and files have selected and the total size.
Figure 66, Volume of selected files

10.3.6 Saving
It is recommended that files be saved into a new folder. Use Windows Explorer to create a new folder on the drive on which you are going to save the files. In the example below, this folder is called “Search 1 Results”.
Once files have been selected (described above), press the Save button (or the Save menu item in the “Recover My Files” drop down menu:
![]()
(Note: The drop down arrow next to the Save button gives access to “Save As”. If this option is selected Recover My Files will prompt for a new file name for each file saved):
The following window will appear prompting for the save location. Click the Browse button to locate and select the folder in which to save the files.
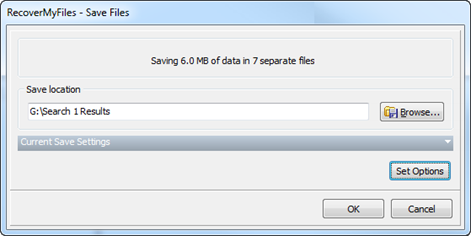
Click the Set Options button to configure advanced saving options: See Save Options - 12.3.
Click OK to begin the save process:
10.3.7 What will the files look like when they are saved?
With default save options set, the saved files will have the same folder and file structure that appears in the "Folder” window. The first level saved folder is the device name (i.e. for a Recover Files search it will be a drive letter, e.g. “C”, and for a Recover Drive search it will be the name of the device searched, e.g. “Hard Disk 1”).
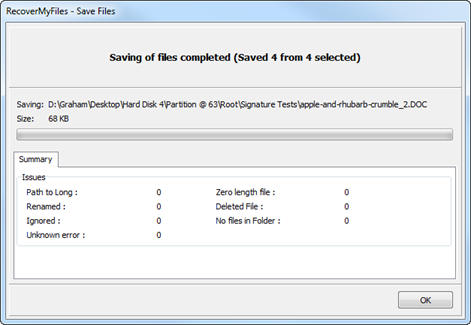
10.3.8 What happens after I save the files?
As a file is saved, the tick is removed from the selection box. The file stays in the search results window. Re-select the file and repeat the process if you wish to save a second copy.
Once the files have been saved, use Windows Explorer to go to the drive on which the files are saved and open them with their creating application, e.g. Microsoft Word, to make sure they open correctly.
Never write new data to the problem drive until you are sure that you have recovered all data that you need. Writing new data to the drive will change its content and may overwrite and destroy deleted or missing files so that a new search will Recover My Files will no longer find them.
Once the files have been saved and tested, use Windows to move or copy them to the required location. If you are running a drive recovery, consider replacing a problem drive rather than re-using it.
Now is a good time to make a copy of the files as a secure backup!
![]() Troubleshooting: The saved files do not open. See 11.4.
Troubleshooting: The saved files do not open. See 11.4.