Chapter 14 – Disk Imaging
Online Manual
Frequently Asked Questions
Data Recovery Basics
Chapter 1 - Introduction
Chapter 2 - Evaluation
Chapter 3 - Installation
Chapter 4 - Purchase
Chapter 5 - Activation
Chapter 6 - User Interface
Chapter 7 - Best Power Settings
Chapter 8 - File Recovery
Chapter 9 - Drive Recovery
Chapter 10 - Saving Files
Chapter 11 - Troubleshooting
Chapter 12 - Options
Chapter 13 - Raid Recovery
Chapter 14 - Disk Imaging
Chapter 15 - Customizing GUI
Chapter 16 - Legal
Appendix 1 - Technical Support
Appendix 2 - File Carving
Appendix 3 - References
Appendix 4 - Definitions
Appendix 5 - Icon Key
14.1 GetData’s Forensic Imager
Included in the Recover My Files installation folder is the stand alone drive imaging program “Forensic Imager”. Forensic Imager is a Windows based program that will acquire a sector copy (“image”) of a drive into one of the following common forensic file formats:
- DD /RAW (Linux “Drive Dump”)
- AFF (Advanced Forensic Format)
- E01 (EnCase®) [Version 6.xx format]
14.2 Running Forensic Imager
Forensic Image is run from the Recover My Files drop down menu by selecting the “Disk Image” option:
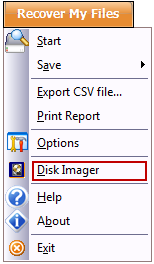
Or by selecting the Disk Imager shortcut from the “Windows Start > All Programs > Recover My Files v5 > Disk Imager” shortcut.
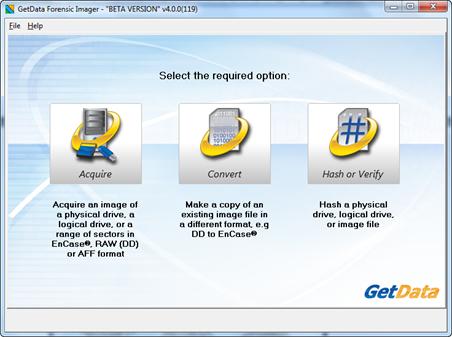
When Forensic Imager is run the wizard presents 3 options:
Acquire: The acquire option is used to take a forensic image (an exact copy) of the target media into an image file on the investigators workstation;
Convert: The convert option is used to copy an existing image file from one image format to another, e.g. DD to E01;
Hash or verify: The hash or verify option is used to calculate a hash value for a device or an existing image file.
When “Acquire” or “Convert” is selected, the subsequent work flow is:
- Select source;
- Select destination options;
- Create the image;
- Display and save event log.
When “Hash or Verify” is selected, the subsequent work flow is:
- Select source;
- Verify;
- Display and save event log.
- The workflow is discussed in more detail below:
Selecting the source
When the “Acquire”, “Convert” or “Hash or Verify” button is selected, the source selection screen is displayed enabling selection of the source media:
- When “Acquire” is selected, the source window shows the available physical devices (hard drives, USB drives, camera cards, etc.) and logical devices (partitions or volumes on the physical devices, e.g. "C:" drive) attached to the forensic workstation.
- When “Convert” is selected, the source window allows the selection of the source image file. Click the “Add Image” button to add the required image file to the selection list.
- When the “Hash or Verify” button is selected, the source window allows the selection of either a physical or logical drive, or an image file.
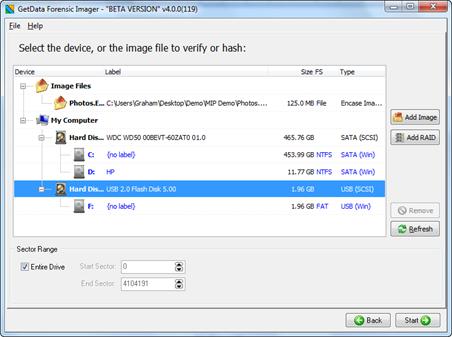
The device selection window includes the following information:
Label:
Physical drives are listed with their Windows device number.
Logical drives display the drive label (if no label is present then "{no label}" is used). Image files show the path to the image.
Size:
The size column contains the size of the physical or logical device, or the size of the image file. Note that the actual size of the drive is usually smaller than what the drive is labeled. Drive manufactures usually round up the drive capacity, so a 453.99 GB drive in this screen may be sold as 500GB.
FS:
The File-system on the drive, e.g. FAT, NTFS or HFS;
Type:
Describes the way in which the drive is connected to the computer. An image file will show the type of image (e.g. EnCase or RAW).
Acquisition of physical vs. logical device
In most situations, pending compliance with any overriding case specific legal requirements, an investigator is most likely to select an image a physical device. Imaging the physical device gives access to the content of the entire media, for example, the space between partitions. Carrier, 2005, observes: “The rule of thumb is to acquire data at the lowest layer that we think there will be evidence. For most cases, an investigator will acquire every sector of a drive”. (2 p. 48)
In specific circumstances, an investigator may need to acquire a range of sectors from the device. In this case, start and end sector information in entered in the sector range fields at the bottom of the source selection window.
To select the source:
- Highlight the required device or image file using the mouse;
- Click the “Next” button is clicked to proceed to the destination window.
Selecting the destination
The image destination screen, shown below, is where the parameters for the image file are set, including type, compression, name, location etc.
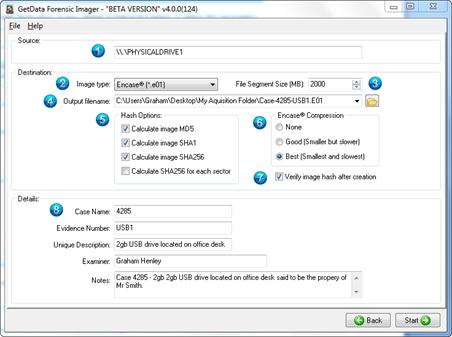
1. Source
The source field shows the device or image file selected in the previous window. This source field cannot be edited here. Select the back button if a change to the source is required.
2. Image Type
The investigator has the choice of creating the forensic image in one of the following forensic file formats:
DD / RAW:
The DD / RAW format originate from the UNIX command line environment. DD /RAW images are created from blocks of data read from the input source and written directly into the image file. The simplicity of a DD image makes it possible to compare the imaged data to the source, but the format lacks some of the features found in more modern formats, including error correction and compression.
Advanced Forensic Format (AFF):
AFF is “an extensible open format for the storage of drive images and related forensic metadata. It was developed by Simson Garfinkel and Basis Technology”. (3). Refer to http://afflib.org/ for further information.
EnCase®.E01
The EnCase® E01 evidence file format was created by Guidance Software Inc. It is widely accepted in the forensic community as the defacto imaging standard. Further information is available at www.guidancesoftware.com. The structure of the EnCase®.E01 format allows for case and validation information (CRC and MD5) to be stored within the image file.
3. File Segment Size
Sets the segment size of the created forensic image file:
This setting enables the forensic image file to be broken into segments of a specific size. Setting an image segment size is primary used when the forensic image files will later be stored on fixed length media such as CD or DVD.
For the EnCase®.E01 image format, Forensic Imager uses the EnCase® v6 standard and is not limited to a 2 GB segment size. However, if an investigator plans to use larger file segments they should give consideration to the limitations (RAM etc.) of the systems on which the image files will be processed.
4. Output filename
Sets the destination path and file name for the image file:
The output file name is the name of the forensic image file that will be written to the investigators forensic workstation. Click on the folder icon to browse for the destination folder.
5. Hash options
Calculates an MD5 and/or SHA256 acquisition hash of the imaged data:
A hash value is a mathematical calculation that is used for identification, verification, and authentication of file data. A hash calculated by Forensic Imager during the acquisition of a device (the “acquisition hash”) enables the investigator, by recalculating the hash at a later time (the “verification hash”), to confirm the authenticity of the image file, i.e. that the file has not changed. Any change to the acquired image will result in a change to the hash value.
Calculation of HASH values during the acquisition process requires CPU time and will increase the duration of an acquisition. However, it is recommended, in line with accepted best forensic practice, that an acquisition hash is always included when acquiring data of potential evidential value. It is also recommended that the investigator regularly recalculate the verification hash during the investigation to confirm the authenticity of the image.
Forensic Imager has three independent hash calculation options, MD5, SHA1 and SHA256. The investigator should select the hash option/s which best suits:
MD5 (Message-Digest algorithm 5):
MD5 is a widely used cryptographic algorithm designed in 1991 by RSA (Ron Rivest, Adi Shamir and Len Alderman). It is a 128-bit hash value that uniquely identifies a file or stream of data. It has been extensively used in computer forensics since the late 1990’s.
In 1996 cryptanalytic research identified a weakness in the MD5 algorithm. In 2008 the United States Computer Emergency Readiness Team (USCERT) released vulnerability Note VU#836068 stating that the MD5 hash:
“…should be considered cryptographically broken and unsuitable for further use”. (5).
SHA1
In 1995 the Federal Information Processing Standards published the SHA1 hash specification which was adopted in favor of MD5 by some forensic tools. However, in February of 2005 it was announced that a theoretical weakness had been identified in SHA1, which suggests its use in this field may be short lived.(6)(7)
SHA-256:
SHA-256 is expected to become the new hash verification standard in computer forensics. SHA-2 is a set of cryptographic hash functions (SHA-224, SHA-256, SHA-384, and SHA-512) designed by the National Security Agency (NSA), and published by the USA National Institute of Standards and Technology.
For more detailed information on hashing and how the strength of a hash value applies to the forensic investigator suggested reading includes: “The Hash Algorithm Dilemma–Hash Value Collisions”, Lewis, 2009, Forensic Magazine, http://www.foreniscmag.com">www.foreniscmag.com.
Sector Hashing
The fourth option in the hash section is “Calculate SHA-256 for each sector”. When this option is selected a separate SHA-256 hash for each individual sector of the target device is created and stored in a file in the same folder as the iamge file.
Like the more commonly used “file hash”, a sector hash can be used to:
- Reduce the volume of a data set by excluding known and trusted sectors from the case. For example, the hash of a blank sector can be used as the identifier to eliminate the need to search all blank sectors in the case; or
- To locate fragments of known files. data in a case. For example, an investigator may search for a fragment of a known document or image file and positively identify the existance (or partial existance) of that file on a drive even if only one sector of that file remains on the drive.
For more information on sector hashing, refer to Yoginder Singh Dandass; Nathan Joseph Necaise; Sherry Reede Thomas, An Empirical Analysis of Drive Sector Hashes for File carving, Journal of Digital Forensic Practice, Volume 2, Number 2, 2008, 95-104.
6. EnCase® Compression
Sets the compression level for the EnCase® forensic image file
The EnCase®.E01 file format supports compression of the image file during the acquisition process. Compressing a forensic image file during the acquisition process takes longer, but the file size of the forensic image on the investigators workstation will be smaller. The amount of compression achieved will depend upon the data being imaged. For example, with already compressed data such as music or video, little additional compression will be achieved.
AFF and DD/RAW image formats do not support compression.
7. Verify image hash after creation
During the acquisition of a device the “source” hash (MD5 and/or SHA1 and/or SHA256 as per the investigator selection) is calculated as the data is read from the source drive. Once the acquisition is complete, the source hash is reported in the event log in the format:
Source MD5Hash: 94ED73DA0856F2BAD16C1D6CC320DBFA
For EnCase®.E01 files the MD5 acquisition hash is embedded within the header of the image file.
When the “Verify image hash after creation” box is selected, at the completion of writing the image file Forensic Imager reads the file from the forensic workstation and recalculates the hash. The verification hash is reported in the event log in the format:
Verify MD5Hash: 94ED73DA0856F2BAD16C1D6CC320DBFA
At the conclusion of the verification process a comparison is made between the source and verification hash. An exact image of the source drive to the image file should result in a “match”:
MD5 acquisition and verification hash: Match
Should the acquisition and verification hash not match, it is an indication that a problem has occurred and the device should be re-acquired.
8. Details
For EnCase®.E01 files, information entered into the “Details” files are written into the image file header and stored with the image. DD/RAW and AFF files do not store this information as part of the image, however they are still required to be entered as for all formats the information is included in the Forensic Imager event log.
14.2.1 Progress
The progress screen displays source information (the drive being acquired) and destination information (location where the forensic image files is being written). Progress information, including elapsed time, time remaining and transfer speed is displayed. The progress window is shown in Figure 6‑8 below:
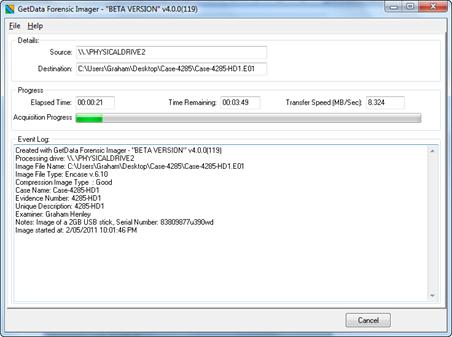
The event log provides feedback to the investigator during the image process.
14.2.2 Log file
The event log for each acquisition is automatically saved to the same folder as the image file/s. A typical event log contains the following type of information:
Created with GetData Forensic Imager - v4.0.0(124)
Processing drive: \\.\PHYSICALDRIVE1
Image File Name: C:\Users\Graham\Desktop\My Acquisition Folder\Case-4285-USB1.E01
Image File Type: Encase v.6.10
Compression Image Type : Best
Case Name: 4285
Evidence Number: USB1
Unique Description: 2gb USB drive located on office desk
Examiner: Graham Henley
Notes: Case 4285 - 2gb USB drive
Image started at: 4/05/2011 11:45:50 PM
Image finished at: 4/05/2011 11:50:25 PM
Elapsed time: 00:04:34
GUID: {D6BF98CA-F3EA-4BBD-88A9-C5E5B07D8600}
Actual Source MD5Hash: 94ED73DA0856F2BAD16C1D6CC320DBFA
Source SHA1Hash: d11d009c71c089dfcdb3dabad4c4014078c15183
Source SHA256Hash: 3370edc5662703534d3ad539d49bcc7f0ca86f559b7faa3c4dc7f7290056d039
Verify MD5Hash: 94ED73DA0856F2BAD16C1D6CC320DBFA
Verify SHA1Hash: d11d009c71c089dfcdb3dabad4c4014078c15183
Verify SHA256Hash: 3370edc5662703534d3ad539d49bcc7f0ca86f559b7faa3c4dc7f7290056d039
Acquisition completed!
MD5 acquisition and verification hash: Match
SHA1 acquisition and verification hash: Match
SHA256 acquisition and verification hash: Match
14.2.3 Bad Sectors and error reporting
Drive errors can occur during the image process due to a problem with the entire drive or a problem isolated to specific sectors. If a bad sector is identified, Forensic Imager writes 0’s for the data that cannot be read and logs the location of bad sectors in the event log as they are found.
14.3 Recovering data from an image file
Disk images can be created in any version of Recover My Files.
![]() However, the ability to read a disk image file in Recover My files is limited to the evaluation version and Professional & Technician licenses. The add image button will not appear when Recover My Files is activated with a Standard license key (see 4.2.4 for a comparison of license features).
However, the ability to read a disk image file in Recover My files is limited to the evaluation version and Professional & Technician licenses. The add image button will not appear when Recover My Files is activated with a Standard license key (see 4.2.4 for a comparison of license features).
To recover data from an image file:
- Run Recover My Files and select the Recover Files or Recover Drive search. Click Next.
- In the drive selection window, click the
 button. Navigate to the location of the image file on your computer and select the image and click the Open button.
 - The selected image file will then be added to the drive selection window under the “Image Files” section, as shown below in Figure 65, Drive selection window showing an added image file. (To add additional image files to this list, repeat the process or to remove image files, highlight the file and use the Remove button):
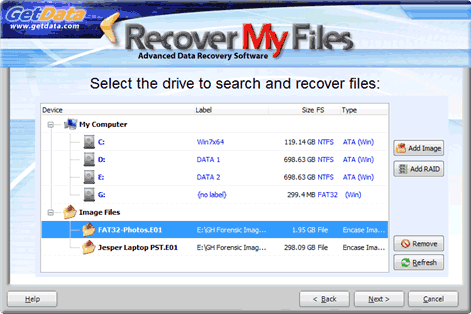
- Highlight the require image from which data is to be recovered and press the Next button.
- Continue with the data recovery as per the instructions: Chapter 8 – Recover Files, and Chapter 9 – Recover a Drive.