Recover My Files v3 quick start guide
Recover My Files v3
Note: This guide is for users of Version 3 of Recover My Files.
Users of the current version, please use this data recovery guide.
Recover My Files is computer data recovery software. It will recover files which have been deleted and emptied from (or bypassed) the Windows Recycle Bin.
Recover My Files will find any type of deleted file, however it will also search specifically for file types that you nominate. Recover My Files will also find drives that are corrupt, no longer recognized by Windows, formatted, and even drives that have been formatted and a new Operating System installed.
Recover My Files does not alter the contents of the drive being searched in any way so you can perform safe data recovery.
The version of Recover My Files that is downloaded from our website is fully functional. It will allow you to preview the contents of the files that it has recovered from your computer. However, you must purchase a product activation key before you can save your files.
It is not currently possible to save files to the drive on which they were deleted. You must save them to other storage media (eg. Second hard drive, floppy disk, USB drive, network, CD or DVD etc).
What type of search should I run on my computer with Recover My Files?
Computer data recovery can be required under many different circumstances. Your problem may relate to deleted files, or you may have an issue with a corrupt or mistakenly formatted drive.
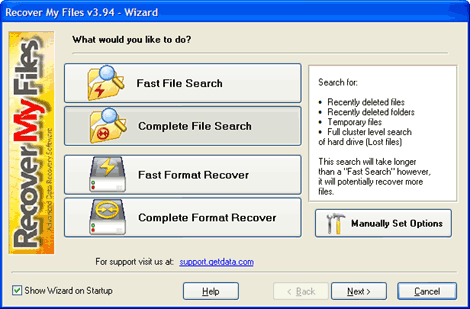
When you start Recover My Files data recovery software using the desktop icon, you are presented with a wizard screen that provides a number of computer data recovery options. Each option uses a different data recovery technique and may be more suited to undelete one type of data loss than another.
As a general data recovery guide:
- if you have deleted files, use the "File Recover" options;
- if you have a corrupt of formatted hard drive, use the "Format Recover" options
- always try the "Fast" option first, followed by the "Complete Search"
- Fast File Search
Will locate recently deleted files. Full file and folder names will be recovered if possible. It will take between 0 - 2 hours to get data back depending on drive size and computer speed. - Complete File Search
Will locate recently deleted files with full file and folder names. Includes an additional full drive search to find "lost files" which are no longer identified by the Windows Operating System. Lost Files are returned with generic names like "Recovered_Word_1". A Complete File Search will take 1 to 8 hours depending on drive size, the number of file types selected and the amount of data on the disk. Multimedia files are the most resource intensive to recover. Run a separate data recovery search for these file types. - Fast Format Recover
Use this search when for formatted or corrupt drives (if a drive letter is not recognized you can select the "physical drive" in the following screen). This search will locate all files in the missing drive partition with full file and folder names. The search will take from 1 to 20 minutes to recover data. - Complete Format Recover
This search is best used when a drive has been formatted and Windows has been reinstalled. Search only for the default selected file types (only add file types if the default selected file types were not on your disk). At the end of the search the old partition will be reconstructed. This Windows undelete will take from 1 to 8 hours depending on drive size, the computer speed and the amount of data on the disk.

Selecting the disk for data recovery
The next wizard screen performs a scan to identify the devices (hard drives, digital camera, USB drive etc) that are connected to your computer. Select the device you wish to search by using your mouse to place a tick in the box next to the device name.
When you are recovering deleted files in most instances you will be placing a tick in the box next to the drive letter. For example, if the files were deleted from your C: drive, place a tick in the box next to the C: drive.
If you are performing hard disk data recovery on a formatted or corrupt hard disk, there may no longer be any drive letters recognized by Windows on your hard disk, or the drive letters may be corrupt or empty of files. In this instance you want to search the "physical drive".
A physical drive is an actual piece of physical data storage media that you can hold in your hand - e.g. a disk, a floppy disk, a zip disk, a camera card etc. A physical disk can have more than one drive letter on it, for example a hard disk can be partitioned into drive C:, D:, and E:.
When you perform hard drive recovery on a physical disk, you are telling Recover My Files to ignore any partitions (drive letters) that are found on the disk, and treat the entire drive as a single block of data. In many cases this is the best way to undelete files and get data back.
Look for the "physical drive" which is the size of your problem drive ("physical drive 0" is usually where the C: drive is located, a secondary drive is "physical drive 1", etc).
The "Folders to Search" option allows you to add existing folders into your search. This allows you to search files that are NOT deleted, such as temporary files, or your Internet Cache, or to find a file that you have moved but can no longer find. Add a folder by double clicking with your mouse in the specified location, remove a folder by double clicking on the folder.
Wizard Screen 2- Selecting the device to search

Selecting file types to recover
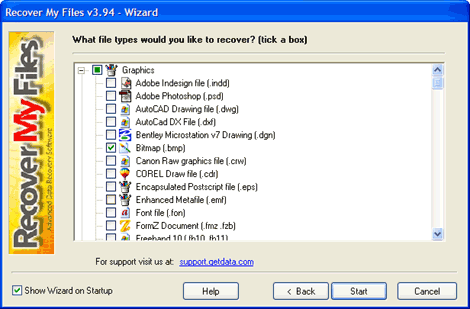
This next wizard screen asks you to select the file types by placing a tick in the box next to the file type.
If you are running a "Fast File Search" or "Complete File Search"
Select the file types that you want to recover by placing a tick in the box next to each file. To maintain search speed, we suggest you select approximately 10 files at a time. Text and video files are the most resource intensive to locate. Run a separate search for these file types.
If the file types that you are trying to recover are not listed here, run a "Fast File Search" and look in the "other files" folder in the search results screen. If your file is not in this folder, then you will need to contact GetData to request specific support for this file type to be added to Recover My Files.
If you are running a "Complete Format Recover"
When you are running a "Fast Format Recover" the file selection window is not required. Your entire partition will be recovered with all file types.
When running a "Complete Format Recover" you are asked to use the default selected file types. These file types have already been selected by default, and are .doc, .xls, .ppt, .avi, .pdf, .jpg, .tif and .zip. Only add more file types if you did not have any of the default file types stored on your drive (for example, if you drive was full of music.mp3 fies). Adding additional file types is not required and will slow the search down. You will still recover all possible files and folders with full file and folder names with only the default files selected.
The default selected file types are use to locate the old Windows drive information. Once Recover My Files uses the default selected file types to narrow down on the location of this data.

Previewing the search results and saving recovered files
When the 'start' button is pressed the search is commenced. Note that a "Complete Search" and a "Format Recover" may take a number of hours as they are a scan of your entire storage media.
It is possible to preview the search results whilst the search is in progress. Use your mouse to move the progress box out of the way and access the search results screen behind it.
Files found are grouped by file type in the left hand column (any files that are found that do not belong to a file type that you selected are placed in the "Other Files" folder). Click on the file type in the left and column to display the files found for that type in the right hand column. Click on an individual file in the right hand column to see its properties and a preview of its contents (if available) in the bottom windows.
File recover is not always possible. Some deleted files will get overwritten. The "recovery" column in the results screen gives an indication of the likely recovery prospects of the file. The best way to determine if a file can be recovered is to preview the content of the file in the preview window. If a preview of the file is not available and the preview window says "corrupt", it is not likely that the file can be opened once it is recovered.
Please note: The download version of Recover My Files is the FULL VERSION. Activating the program gives the ability to save recovered files. It does not change the search results.
The Results Screen
Recover My Files must be registered in order to save files. A product activation key can be purchased at our purchase page. To enter the product activation key click 'Help' and then 'Activate Product.'.
Select files to be saved in the results screen by placing a tick in the box next to the file. To select multiple files to be saved hold down the CNTRL key, use your mouse to select the files that you wish to save, and then press the SPACE BAR to add or remove ticks. You can also use the SHIFT key to select group of files in this fashion.
Once you have selected the recovered files that you wish to save, click the save button. You must save files to a separate storage media to the one on which they were recovered. You can save files directly to a writable CD/DVD. Select the drop down arrow next to the "Save Files" button in the results screen to access this feature.


